
Fall has come and gone and the holiday season approaches, many new or experienced homeowners are beginning to plan their holiday decorations, including the Christmas light display. Before you start to move things out of your garage or storage space, make sure to read on some helpful tips that can help your installation go smoother. Additionally, you want to make sure there is no damage to other parts of your home during the install.
Can Christmas Lights cause any type of roof damage?
Christmas lights are small and usually made of plastic, so its safe to say they can’t cause extensive damage to your roof. However, its still important to make sure that the installation is done correctly and carefully. You don’t want to make small holes or punctures on the shingles or other surfaces because, over time, these can create more damage. Especially when the temperatures drop and water freezes, causing small holes to expand.
Installation Supply List
Before you hop on the roof, its important to have the following items. These will ensure that you don’t have to make a trip to the store or need to call for help in case you’re stuck on the roof. The following items we suggest are:
- Ladder: Get a ladder depending on the size and height of your roof. We have to specify to be careful and make sure the ladder is well established before you begin to climb up. If the roof is steep, we recommend to step carefully or even use a hanging pole if necessary.
- Lights: Make sure to test your lights and that these work properly before installation. You do not want to install everything and be done, only to find out that some light bulbs do not turn on.
- Plastic Clips: Plastic clips are necessary to make sure the lights are properly aligned and stay in place. There are different types of plastic clips, so get the correct one depending on the type of light you are installing. If you are installing different types of lights or don’t want to put in too much research, you can use the all application clip.
- Extension Cord(Outdoor): Make sure to purchase the outdoor extension cords, these are perfect for all type of outside weather conditions.
- Timers/ Light Controllers: Helpful for the homeowner who doesn’t remember to turn off their lights before they go to bed or the homeowner who is wanting to decorate and also save on their electricity bill this winter.
Types of Christmas Lights
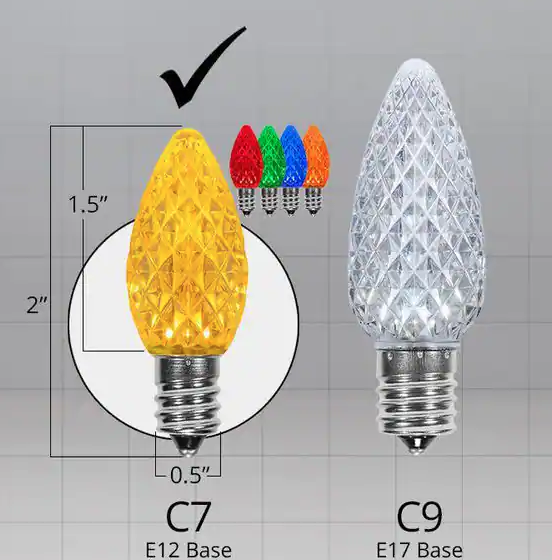
Nowadays, there are many different types of lights homeowners can choose from. The most common type of light is the c type. The c stands for cone or candle and named after the shape of the light. Sizes range from C3 to C9, the smaller the number, the smaller the size.
- String lights: The most common type of Christmas light. The shape of each light resembles a candle. Measurements are typically from 1/4-inch in diameter.
- LED Christmas Lights: LED lights create light without having to create heat, they are known as light emitting diodes. These type of lights are newer while being efficient. These type of lights are more durable as well as they don’t contain mercury and do not get hot.
- Incandescent lights: Create heat which then turns into glowing of the inner filaments. These type of bulbs heat up until they blow out as 90% of their energy releases heat.
- Battery operated lights: These range from incandescent mini lights to LED options and come in different battery sizes. Just make sure to replace the batteries if they run out.

Type of Clips
Depending on the roof you have, take a look at the different available clips you can use without damaging your roof or gutters.
- Line clips: Line clips do what their name say, clip right on the line of the lights itself. These typically
- Bulb clip: These clips hold onto the bulb itself and create a linear, clean look as each bulb points towards the same direction. Installation involves hooking the clips to the gutters or drip edge portion of your house. Bulb clips are highly resistant and work great during windy areas.
- Simple hooks: These hook over the edge of the gutters. You place the line lights onto these hooks.
- Roof peak clips: installation occurs on the peak of the roof and at the edge of the shingle. Peak clips can be challenging to install and are typically used by professional installers.
Installation Plan
Before doing any type of DIY project, its always a good idea to have a plan ready.
- Light type: The first and most important thing is to choose the correct light type and that its good for outdoor usage.
- Focus on the lights: Since every home is different, you need to choose which part of your house you want to highlight. Some people want to bring focus to their front door entrance, others want to highlight windows or chimneys. Whichever part you choose, make sure to place the brightest lights or more decorative lights on the designated area.
- Designated light clips: Choose the best light clips, depending on your application technique you might want to pick universal clips for the roof lines.
- Keep instructions in mind: Make sure to know the connection limit amounts and to follow it to a tee. If the directions are not followed thoroughly, the lights can be a fire hazard.
How To Install Christmas Lights Like a Pro
Pro Tip: Light installers with plenty of experience take the proactive approach. They measure the house, starting at the base and along the corners, door and window frames. This way, its easier to determine the correct or close number of lights you need to use.
Christmas Light Power Watts
Giving your house a festive flair during the holiday seasons needs to be done properly, the last thing you want to cause is a power outage that ends up blowing a fuse. Keep in mind two main things when it comes to electricity. One is the max amount of watt capacity of your string lights and two, the max amount watt capacity of your house circuit.
Keep in mind that the more lights you plug in, the more electricity you use. But make sure not to plug in so many that you exceed the amp capacity or trip the breakers in the fuse box. Commonly, most home circuits conduct between 15-20 amps, therefore, do not go past 80% of the max watt capacity or there could be issues.
The main thing is to know how many watts your Christmas lights use. You can find the information on the UL tags that come on the string. Make sure to account between the measurements of what type of lights you use. For example, LED mini lights use less watts than incandescent ones. It depends on the type and amount of lights you use.
Safety First
We recommend that you do not attempt to hang Christmas lights during any rain or snow storm, if there is snow or ice visible on the roof or ground or any type of wet conditions outside. During the installation, make sure to have some help. Having someone near you in case there are any issues.
Hanging the Lights
First: After making sure someone is helping you and before getting on the ladder, make sure to attach the beginning few clips to the cord or bulb first. Its easier to
Second: Attach all extension cords accordingly and start from the lowest part of the roof and the one closest to the outlet. Do not plug in the outlet or turn the lights on yet.
Third: Climb on the ladder. Attaching the clips alongside the gutters.
Fourth: Make sure to leave enough room for each clip and light so that the lines are straight and the lights match the roof line.
Fifth: Keep your balance, do not try to stretch or reach out so far that it becomes difficult or dangerous to install.
Sixth: If you do get up on the roof, make sure to not puncture the shingles. You do not want to cause any damage to your roof.
The final step is place the lights to your heart’s desire. While there are many different ways to decorate, its really up to you. Whether going for a symmetrical look, clusters, shapes or swirls, there is no wrong way to decorate your home.
Other ways to install lights without a ladder
The best way to install lights without wanting to get on a ladder or not wanting to get on a roof is to use a light hanging pole.
First, attach the clips to lights and then place these to the end grip of the pole. It might take a few tries to get the hook of the clip installed correctly but its a safer option.
Another option is to hire a company to install the lights. They will be able to install them quickly, usually in a day, and follow all safety rules without a hassle.

Taking Lights Down After the Holidays
Once the holidays have come and gone, its time to take down the lights. We recommend that you do not simply pull on the strings for a quick removal. This could cause damage to your shingles or gutters. Safely take down the light clips one at a time, carefully.
Storage of your decorations is equally important, if you want to use them year after year. Make sure that the lights are not twisted since they could kink and damage and you will not want to use them for the following year.
Christmas Lights FAQs
We have gathered some of the most pressing questions homeowners might have.
Which type of lights cost less?
LED Christmas lights use less electricity than any other type of light display available. They also last longer, the average LED lights last 75,000 to 100,000 hours. Making them a great addition to your decorations.
Does using a timer help save on electricity costs?
Yes, by using timers you can schedule the amount of hours that your lights are on so that they are not on all night. A timer usually costs between $10 and $20 on a budget.
How much does it cost to have a professional hang up our lights?
While a quote will vary based on the lights you are using, the size and steepness of your roof. For reference, the average cost of a simple display costs between $200-$600 on average. However, it can range up to a thousand dollars for larger properties with extravagant displays.
Want more home tips? Check out our blog! We update our posts weekly and help homeowners maintain their homes properly.